Apply Discount Code
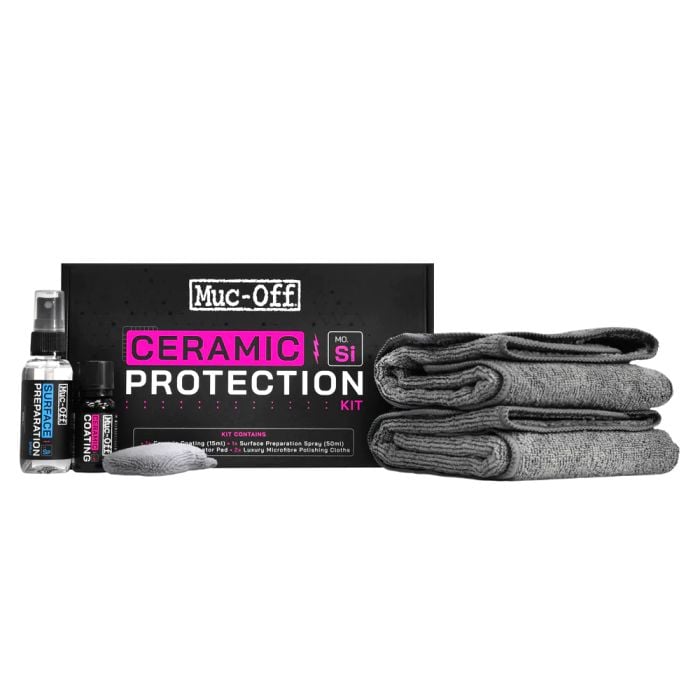
Muc-Off Ceramic Protection Kit
£54.98
SKU
20964
The Muc-Off Ceramic coating is a highly advanced, durable, silicon-infused protective layer that chemically bonds to your paintwork, producing a high-performance hydrophobic layer for maximum water and dirt shedding properties... Read More.....
Ready for Dispatch
The Muc-Off Ceramic coating is a highly advanced, durable, silicon-infused protective layer that chemically bonds to your paintwork, producing a high-performance hydrophobic layer for maximum water and dirt shedding properties.
It’s designed to keep your steed cleaner for longer, and much easier to clean and maintain. This is because the coating drastically reduces the surface tension, providing long term, year-round protection to your pride and joy, even in the harshest weather conditions.
It also contains UV protection to help ensure your paint doesn’t fade in direct sunlight and can help reduce the risk of micro scratches.
Safe to use on paintwork, carbon fibre, metal components, wheels, vinyl and rigid plastic trim with protection lasting up to 2 years as its chemical resistant. You can use it on Gloss or Matt finishes (After curing it will give a richer and darker colour tone on matt finishes).
Features:
- Quick and easy to apply
- Superior paint gloss enhancement
- Industry-leading slickness
- Dirt and grime repellence
- UV Protection
- Extreme water shedding and hydrophobic properties
- Liquid repellence providing a water contact angle of between 100°- 110°
- 9H Scratch resistance
- Chemical resistance
- Durable – Can last up to 2 years on surfaces*
- Perfect for Bicycles, E-Bikes, Motorcycles, Cars, ATV’s and more
- Suitable for gloss and matt finishes. (After curing it will give a richer and darker colour tone on matt finishes)
- Can be used on paintwork, carbon fibre, metal components, wheels, vinyl and rigid plastic trim
- Makes cleaning and maintenance a breeze
- *Ensuring you follow all preparation, application and maintenance instructions included on the packaging.
What's Included
- 1 x 15ml Ceramic Coating
- 1 x 50ml Surface Preparation Spray
- 1 x Microfibre Applicator Pad
- 2 x Luxury Microfibre Buffing Cloths
Preparing The Surface
- Thoroughly wash your bike using Nano Tech Bike Cleaner, Punk Powder or Snow Foam, then ensure it is completely dry before starting the coating process
- Depending on the condition of the paint or surface, perform the appropriate level of paint correction to remove any defects including swirl marks, water spots, and scratches. Keep in mind this product is very durable and will seal in any imperfections
- Remove any excess paint correction or wax/polish residue by wiping all painted surfaces with surface prep spray. Simply spray onto the microfibre cloth and wipe down
Ceramic Coating Application
- We recommend applying the coating in a cool, dry, clean area, inside with good lighting and ventilation. For non-factory finishes test a small inconspicuous area prior to full coverage.
- Shake the bottle thoroughly for 10 seconds to activate the formula.
- We recommend wearing protective gloves when applying the coating.
- Unscrew the child-resistant cap, then apply the coating sparingly and evenly along the provided microfiber applicator pad. (A little coating goes a long way).
- Starting at the highest surfaces, work in a crosshatch #, overlapping pattern to ensure all areas are coated. We recommend limiting application areas to the approximate size of 1 bike tube/panel at a time. Relax and take your time, applying slowly and carefully for the best results.
- Add additional coating to the applicator pad when the coating is not being applied evenly and or the applicator does not glide over the surface smoothly.
- Allow the wet coating to cure for 5 minutes. During this time the coated surface will develop a rainbow-like appearance. In this time check that you have covered all areas. Using the provided microfiber cloth, lightly buff the surface using small circular motions to a high gloss, mirror-like fi Be sure to check the surface in multiple light angles to ensure all the rainbow effect has been removed. Do not allow the wet coating to cure for longer than 5 minutes and ensure it has all been buffed off.
- Once buffed off, let the coating fully cure for 24 hours in a cool dry place before exposing it to water or the elements. (For best results and adhesion, we do not recommend washing for at least 48 hours after application).
- You can easily layer up the coating with a second application for even longer durability, simply follow the costing application instructions above after the first layer has fully cured. You do not need to re-prep.
- Use within 6 months once opened
- Go ride!
Maintenance/Cleaning
- In order to properly maintain your ceramic coating, we would only recommend cleaning using our Nano Tech Bike Cleaner, Punk Powder, or Snow Foam. Avoid using other solvents or acidic cleaners as these will break down the coating much quicker.
- Keeping the surface clean will ensure you retain the hydrophobic properties of the coating.
- If you notice the surface starts to lose some of the hydrophobic water-beading properties over time you can simply top up and refresh the coating. We recommend a top-up every 6 months to maintain optimal performance.
Frequently Asked Questions
How many applications will I get out of a 15ml bottle?
- On average you will get 2 full bicycles per bottle or one motorcycle
Why do I need to leave it for so long to cure after applying?
- The coating needs at least 24 hours inside in the dry to properly cure and form a bond to the paintwork, so it is not ruined by rain. After 24 hours it's safe to use outside but we wouldn’t recommend washing or getting wet for at least 48 hours. The coating can continue to cure for 3-5 days after application so the longer you leave it the better the results and durability
How long is the shelf life of Ceramic Protection?
- Ceramic protection has a 2 year shelf-life from purchase, and we recommend using within 6 months of opening the bottle for best results
Is Ceramic Protection safe to use on a Titanium Frame / Matte Finish / Gloss / Frame Protection / Carbon Fibre Frame
- Titanium Frame - Yes it's suitable for titanium
Matte / Gloss Finish - Yes, Ceramic Protection is suitable for gloss and matt finishes. (After curing it will give a richer and darker colour tone on matt finishes)
- Frame Protection - Yes it's suitable to use on frame protection. We would recommend applying Ceramic Protection after installing Frame Protection though as the Frame Protection may not bond as well if applying after Ceramic Protection.
Carbon Fibre - Yes, we have tested on carbon fibre
Why Use Ceramic Protection?
- Why ceramic coating? Why not wax? Or other protectants and polishes?
- Ceramic Protection is designed to keep your bike cleaner for longer, protecting and prolonging the life of your paintwork.
- In turn this investment helps maintain your bikes value, helps reduce your cleaning and maintenance time because of the slickness of the coating and gives the surface a level of gloss and colour depth incomparable to anything else.
- It also contains UV protection to help ensure your paint doesn’t fade in direct sunlight and can help reduce the risk of micro scratches.
- Lead Time: 0
Write Your Own Review
Only registered users can write reviews. Please Sign in or create an account
People also bought


New Rider?
FREESTYLE VS RACING BMX BIKES?
Choosing the correct bike for your discipline is extremely important, and sometimes for those new to the sport it can be difficult to know or decide, so we’ve broken down the main differences to help you make a decision.
Freestyle bikes are designed for the skatepark, the streets or the trails. They are constructed from strong, hard wearing materials and usually feature Steel or Chromoly frames. This means that the bike can stand up to a certain amount of impacts and hard landings, but remember no bike is indestructible. For riders looking to learn tricks and stunts, then a freestyle bike is the correct choice.
Race bikes are designed specifically with the track in mind, they are nimble lightweight machines for putting down quick lap times. Typically, they are constructed from lightweight materials like aluminium and carbon fibre to keep the weight down and the rider at the front of the pack. These bikes are strong enough for smooth landings on race and pump tracks but will not take the abuse that a freestyle bike would in concrete skateparks. If you’re looking to set fast lap times or begin your competitive career on the track, a race bike is the right choice.
WHAT SIZE BIKE WOULD I NEED?
Choosing the correct size BMX bike is very important, bikes that are too large will be cumbersome and hard to manoeuvre and bikes that are too small can feel cramped and hard to keep under control.
Youth freestyle bikes are sized depending on the diameter of the wheel staring at 12” all the way through to 18”, at a 20” wheel the bike is considered an adult size. Adult freestyle bikes are sized on top tube length, a 18.5” top tube is extra small for younger teenagers who have just moved up to an adult bike, a 20” top tube is small, 20.5” a medium and anything over a 21” is considered large.
Race bikes feature 20-inch wheels on all models, but the components and frame are sized dependent on age and height. Youth race bikes start from a Micro size for very young riders and offer a range of sizes through to expert XL. Pro size and upwards are considered adult bikes and are usually offered up to a Pro XXXL or larger for very tall riders.
We recommend consulting our height charts from the link below to help you choose your perfect sized bike:
WHAT LEVEL DO I NEED?
Choosing the right level bike for your riding ability is important. Components that are not suitable for your level of riding can wear or fail much sooner than expected. Although BMX bikes can look very similar, under the surface components and materials used can vary greatly.
All our bikes are cherry picked from the very best BMX specialist brands, and all our bikes are designed specifically for use at the skatepark or on the track.
FREESTYLE BIKES
For first time riders new to the sport our entry level bikes, priced from £200-£400, are perfect, most of these are made from high tensile steel which means they are still relatively strong, but can be slightly heavier than higher end models. You might find you’ll want to upgrade to something lighter sooner than you’d think. If you are planning on using the bike in rain or bad weather, we do strongly advise choosing a model with fully sealed bearings all round.
If you are already confident on a bike and have some experience in skateparks or performing tricks and jumps then we would recommend choosing a mid-range bike, priced from £400 to £700, with a full Chromoly frame, fork, and bars. This will be lighter and stronger than an entry level model.
For an experienced person that is already capable of performing most tricks and has previously owned BMX bikes then a high-end complete bike, or full custom would be suggested to meet the demands of this rider, these bikes are priced from £700 plus.
RACE BIKES
Our range of entry level race bikes are perfect for first time racers, usually priced between £200 and £400 most of these are constructed of heavier steel rather than aluminium. These are great to get a feel for the sport but would not be able to keep up in a competitive environment.
Our mid-range race bikes are the perfect for riders who are beginning their path to competitive racing. Priced between £400 and £800 these are not quite the high-end steeds you see at national level races, but they all feature lightweight aluminium frames and are designed specifically with the racetrack in mind.
For experienced riders who are already racing confidently at a competitive level we offer a small range of high-end complete bikes. These are usually priced between £800 and £1500 and feature many aftermarket components like carbon forks, disc brakes and folding tyres. However, at this level we highly recommend building a full custom bike, usually costing between £1500 and £3000 all components can be chosen specifically with the rider in mind. For help on building a custom bike give us a call or drop us an email!
CASSETTE OR FREECOASTER
One of our most frequently asked questions in freestyle is, which rear hub do I want, a freecoaster or a cassette? Most experienced riders know their preference, but if you’re new to the sport it can be difficult to know which choice to make.
The main difference between the two is the way the bike performs when going backwards. A traditional cassette hub requires the rider to pedal in time with the rotation of the wheel while travelling backwards, while a freecoaster allows the rider to travel backwards while keeping the pedals level in the same position as riding forwards.
Although this may seem like a brilliant feature, it does come at a price! Freecoaster hubs feature a “Slack” before engagement while pedalling forward. This means that you can turn the crank a set amount (Usually an adjustable amount) before the drivetrain engages. This is referred to as the “Slack”, when riding backwards you must keep your feet positioned within the slack, if your pedals rotate too much the drivetrain will engage and your pedals will start to rotate. The smaller the slack, the harder it is to keep your pedal positioned within it while riding backwards. This means that certain tricks are harder to perform, especially those that rely on pedal pressure, for example Tire Taps.
